날씨 정보를 얻기 위해 OpenWeatherMap을 사용
왜??
•
처음에는 기상청 날씨API를 사용하려 했으나 경도와 위도를 입력값으로 받아야되고 또한 기상청 격자 정보에 맞게 변환을 해주는 과정이 추가적으로 필요하여 도시이름만 입력받아도 날씨정보를 받을수 있는 OpenWeatherMap을 사용하게 되었다.
OpenWeatherMap 사용법
회원가입을 진행하면 날씨API를 사용할 수 있게 해주는 API KEY를 제공 받는다.
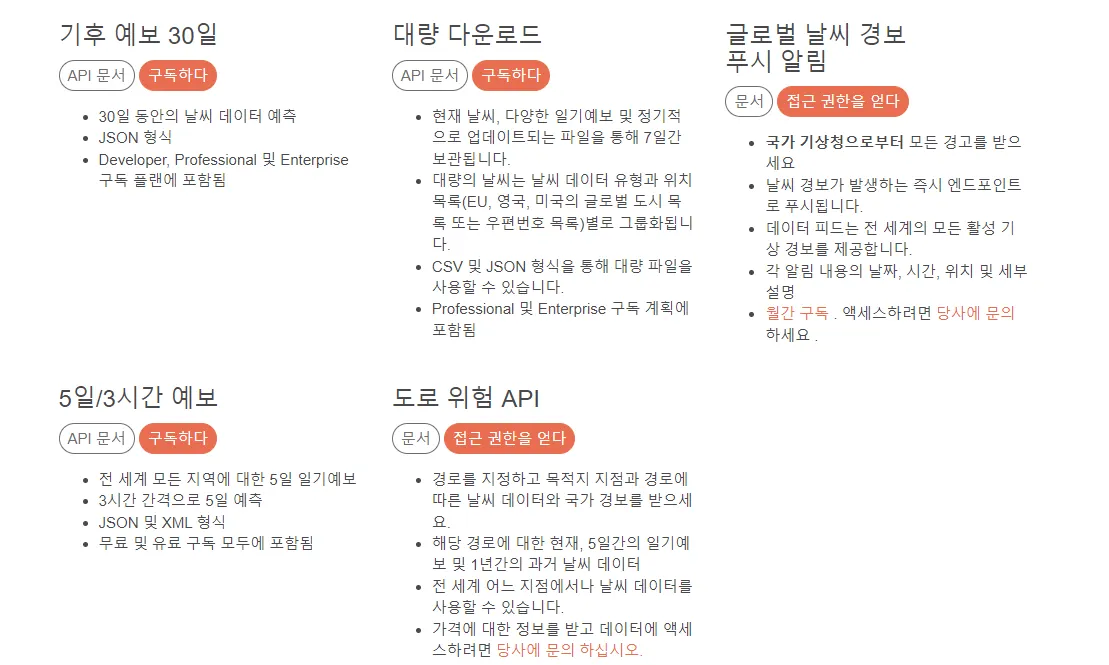
여러 API를 사용할수 있으나 무료버전과 유료버전이 있고 MyPaldoTrip 사이트에는 무료버전인 5일/3시간 예보를 사용했다.
API문서를 들어가면 내가 보내야 하는 API CALL 형식을 알수 있다.
api.openweathermap.org/data/2.5/forecast?q={city name}&appid={API key}
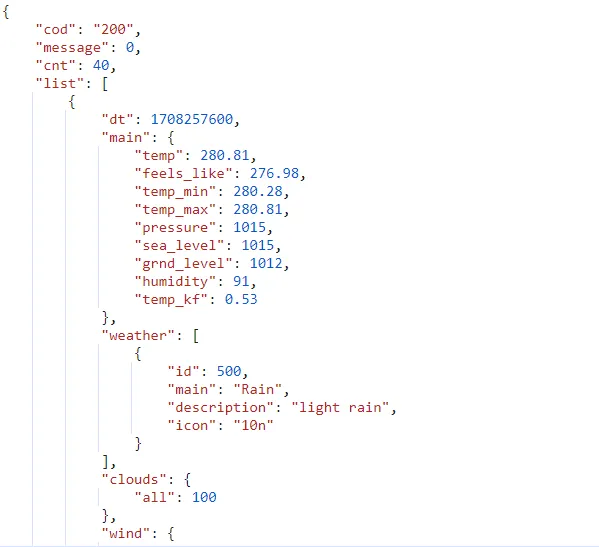
실행되는지 확인해보자
잘 실행되는것을 확인했으니 프로젝트에 적용시켜보자
application.yml에 API KEY를 넣어서 관리한다.
weather:
api-key: ${WEATHER_API_KEY}
Java
복사
API CALL에 넣어줄 city name을 위한 CustomOpenWeatherReq 생성
Java
복사
public record CustomOpenWeatherReq(String cityName) {}
Java
복사
원하는 정보만 받을수 있도록 API response를 만들어 준다.
public record OpenWeatherRes(@JsonProperty("list") List<WeatherItem> list) {
public record WeatherItem(
@JsonProperty("main") Main main,
@JsonProperty("weather") List<Weather> weather,
@JsonProperty("dt_txt") String date) {}
public record Main(
@JsonProperty("temp_min") double temp_min, @JsonProperty("temp_max") double temp_max) {}
public record Weather(@JsonProperty("main") String main) {}
}
Java
복사
@JsonProperty은 객체를 JSON 형식으로 변환할 때 Key의 이름을 설정할 수 있다. 이를 활용하여 JSON 데이터의 각 필드를 해당하는 Java 클래스의 필드와 매핑시킨다.
형식에 맞게 Controller 생성
@PostMapping("/open")
public ResponseEntity<RestResponse<List<CustomOpenWeatherRes>>> openWeatherAPI(
@RequestBody CustomOpenWeatherReq openWeatherReq) {
OpenWeatherRes res = weatherService.getOpenWeather(openWeatherReq);
List<CustomOpenWeatherRes> customWeatherList = weatherService.processWeatherData(res);
return ResponseEntity.ok(
RestResponse.success(
customWeatherList, GlobalResultCode.SUCCESS, versionConfig.getVersion()));}
Java
복사
Service 생성
public class WeatherService {
@Value("${weather.api-key}")
String apiKey;
public OpenWeatherRes getOpenWeather(CustomOpenWeatherReq openWeatherReq) {
String changeCityName = CityMapping.convertToEnglish(openWeatherReq.cityName());
String url = "https://api.openweathermap.org/data/2.5/forecast";
WebClient webClient = WebClient.builder().baseUrl(url).build();
String apiUrl = "?q={cityName}&appid={APIkey}&units=metric";
String uriString =
UriComponentsBuilder.fromUriString(apiUrl)
.buildAndExpand(changeCityName, apiKey)
.toUriString();
OpenWeatherRes weatherResponse =
webClient.get().uri(uriString).retrieve().bodyToMono(OpenWeatherRes.class).block();
List<WeatherItem> weatherfilteredList = Collections.emptyList();
if (weatherResponse != null && weatherResponse.list() != null) {
weatherfilteredList = weatherResponse.list().stream().toList();
}
return new OpenWeatherRes(weatherfilteredList);
}
Java
복사
@Value 를 사용하여 application.yml에 작성한 API KEY 값을 가져오기
@Value("${weather.api-key}")
String apiKey;
한글 도시이름을 영문 도시이름으로 매핑
String changeCityName = CityMapping.convertToEnglish(openWeatherReq.cityName());
Java
복사
WebClient를 사용 왜??
String url = "https://api.openweathermap.org/data/2.5/forecast";
WebClient webClient = WebClient.builder().baseUrl(url).build();
Java
복사
주어진 URL을 기본 URL로 사용하여 WebClient를 생성,
이렇게 하면 URL을 다시 지정할 필요 없이 해당 기본 URL을 기준으로 요청을 보낼 수 있다.
String apiUrl = "?q={cityName}&appid={APIkey}&units=metric";
String uriString =
UriComponentsBuilder.fromUriString(apiUrl)
.buildAndExpand(changeCityName, apiKey)
.toUriString();
Java
복사
UriComponentsBuilder.fromUriString(apiUrl)를 사용하여 문자열을 기반으로 URI를 생성,
apiUrl에 있는 cityName과 APIkey에 .buildAndExpand(changeCityName, apiKey)를 사용하여 실제값을 전달
OpenWeatherRes weatherResponse =
webClient.get().uri(uriString).retrieve().bodyToMono(OpenWeatherRes.class).block();
Java
복사
WebClient를 사용하여 HTTP GET 요청을 보내고, 그에 대한 응답을 받아와서 처리
이러한 과정을 통해 날씨 api를 완성


